|
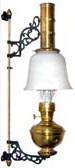
Burning your Aladdin lamp
The art of burning a mantle lamp is one of those common skills
that most everyone learned as a kid growing up in unelectrified
rural America. Unfortunately
for those who grew up in electrified America the skill is not completely
obvious and ignorance of proper techniques can quickly lead to
frustration. A
lot of newer Aladdin lamps get put up for sale by frustrated
owners who tried to burn the lamp at full brightness right away
and ran into problems.
Burning a mantle lamp is easier
to understand when you know how the lamp gives off light. Unlike
conventional wick lamps the purpose of the flame is not to give
off light. It
is to heat the mantle to around 2000 degrees Fahrenheit which
causes the mantle to glow. The burner is designed to
mix air and fuel to the correct ratio that creates a
hot blue flame. The
wick is designed to flow fuel evenly and to burn with an even
blue flame. The long Aladdin chimney helps draw the hot exhaust
air out so that the right amount of fresh air comes into the burner
to maintain the hot blue flame.
For the sake of this description I'm assuming that you have a
clean complete lamp in good condition and that you have a fresh
or known good wick installed.
Crownplace Brands, the owner of Aladdin has a YouTube channel with videos showing how to maintain and use your Aladdin lamps. The videos are specifically for the newer lamps but there is a lot of good information there:
Here is the instruction booklet for the model 23A burner. It is probably the best and easiest to understand of the bunch. It can cover all of the Aladdin lamps, but most particularly all the side draft lamps from model 12 and newer.
Instruction booklets for Aladdin Lamps:
Other Aladdin instructions:
Kerosene:
You should only burn high quality clear K-1 kerosene. The
less expensive K-2 kerosene has a higher sulfur content that
creates a hard deposit on the burning surface of the wick and
shortens the wick life. Low sulfur
K-1 burns without creating an odor. Scented
and colored kerosene clogs a wick so that it no longer flows evenly. A
partially clogged wick creates an uneven flame that prevents the
mantle from
burning
properly.
A clogged wick that will not burn correctly often looks just
the same as a good condition used wick. The air burner's airflow to the wick is calibrated for high quality K-1 kerosene. Using another product will create an unbalanced air to fuel ratio. Same goes with using a clogged or partially clogged wick.
Purchase
kerosene either in sealed containers or from a source that is
pumped directly out a drum normally kept inside and sealed. Moisture
can collect in kerosene stored in vented containers. Once
in your lamp, water collects at the bottom of the lamp and in
the wick where it
creates an uneven flame. If purchasing K-1 kerosene
from an open barrel, sniff the opening. Avoid kerosene
with moderate
to strong odors. A strong odor. indicates the kerosene
has become contaminated or partially evaporated.
Aladdin kerosene lamps were designed to be burned daily and
provide long trouble free service with regular maintenance. These
days, most people only burn lamps occasionally or only during
the winter season. Kerosene left in a standing lamp
will go bad and clog the wick. The more volatile components
of kerosene will evaporate leaving a smelly sludge behind that
gets embedded in
the wick. If
you plan to go a while without burning the lamp, remove the burner,
pour out the kerosene and let the wick dry in the open air before
reassembling the lamp. Then add new kerosene at least 2
hours before trying to light the lamp.
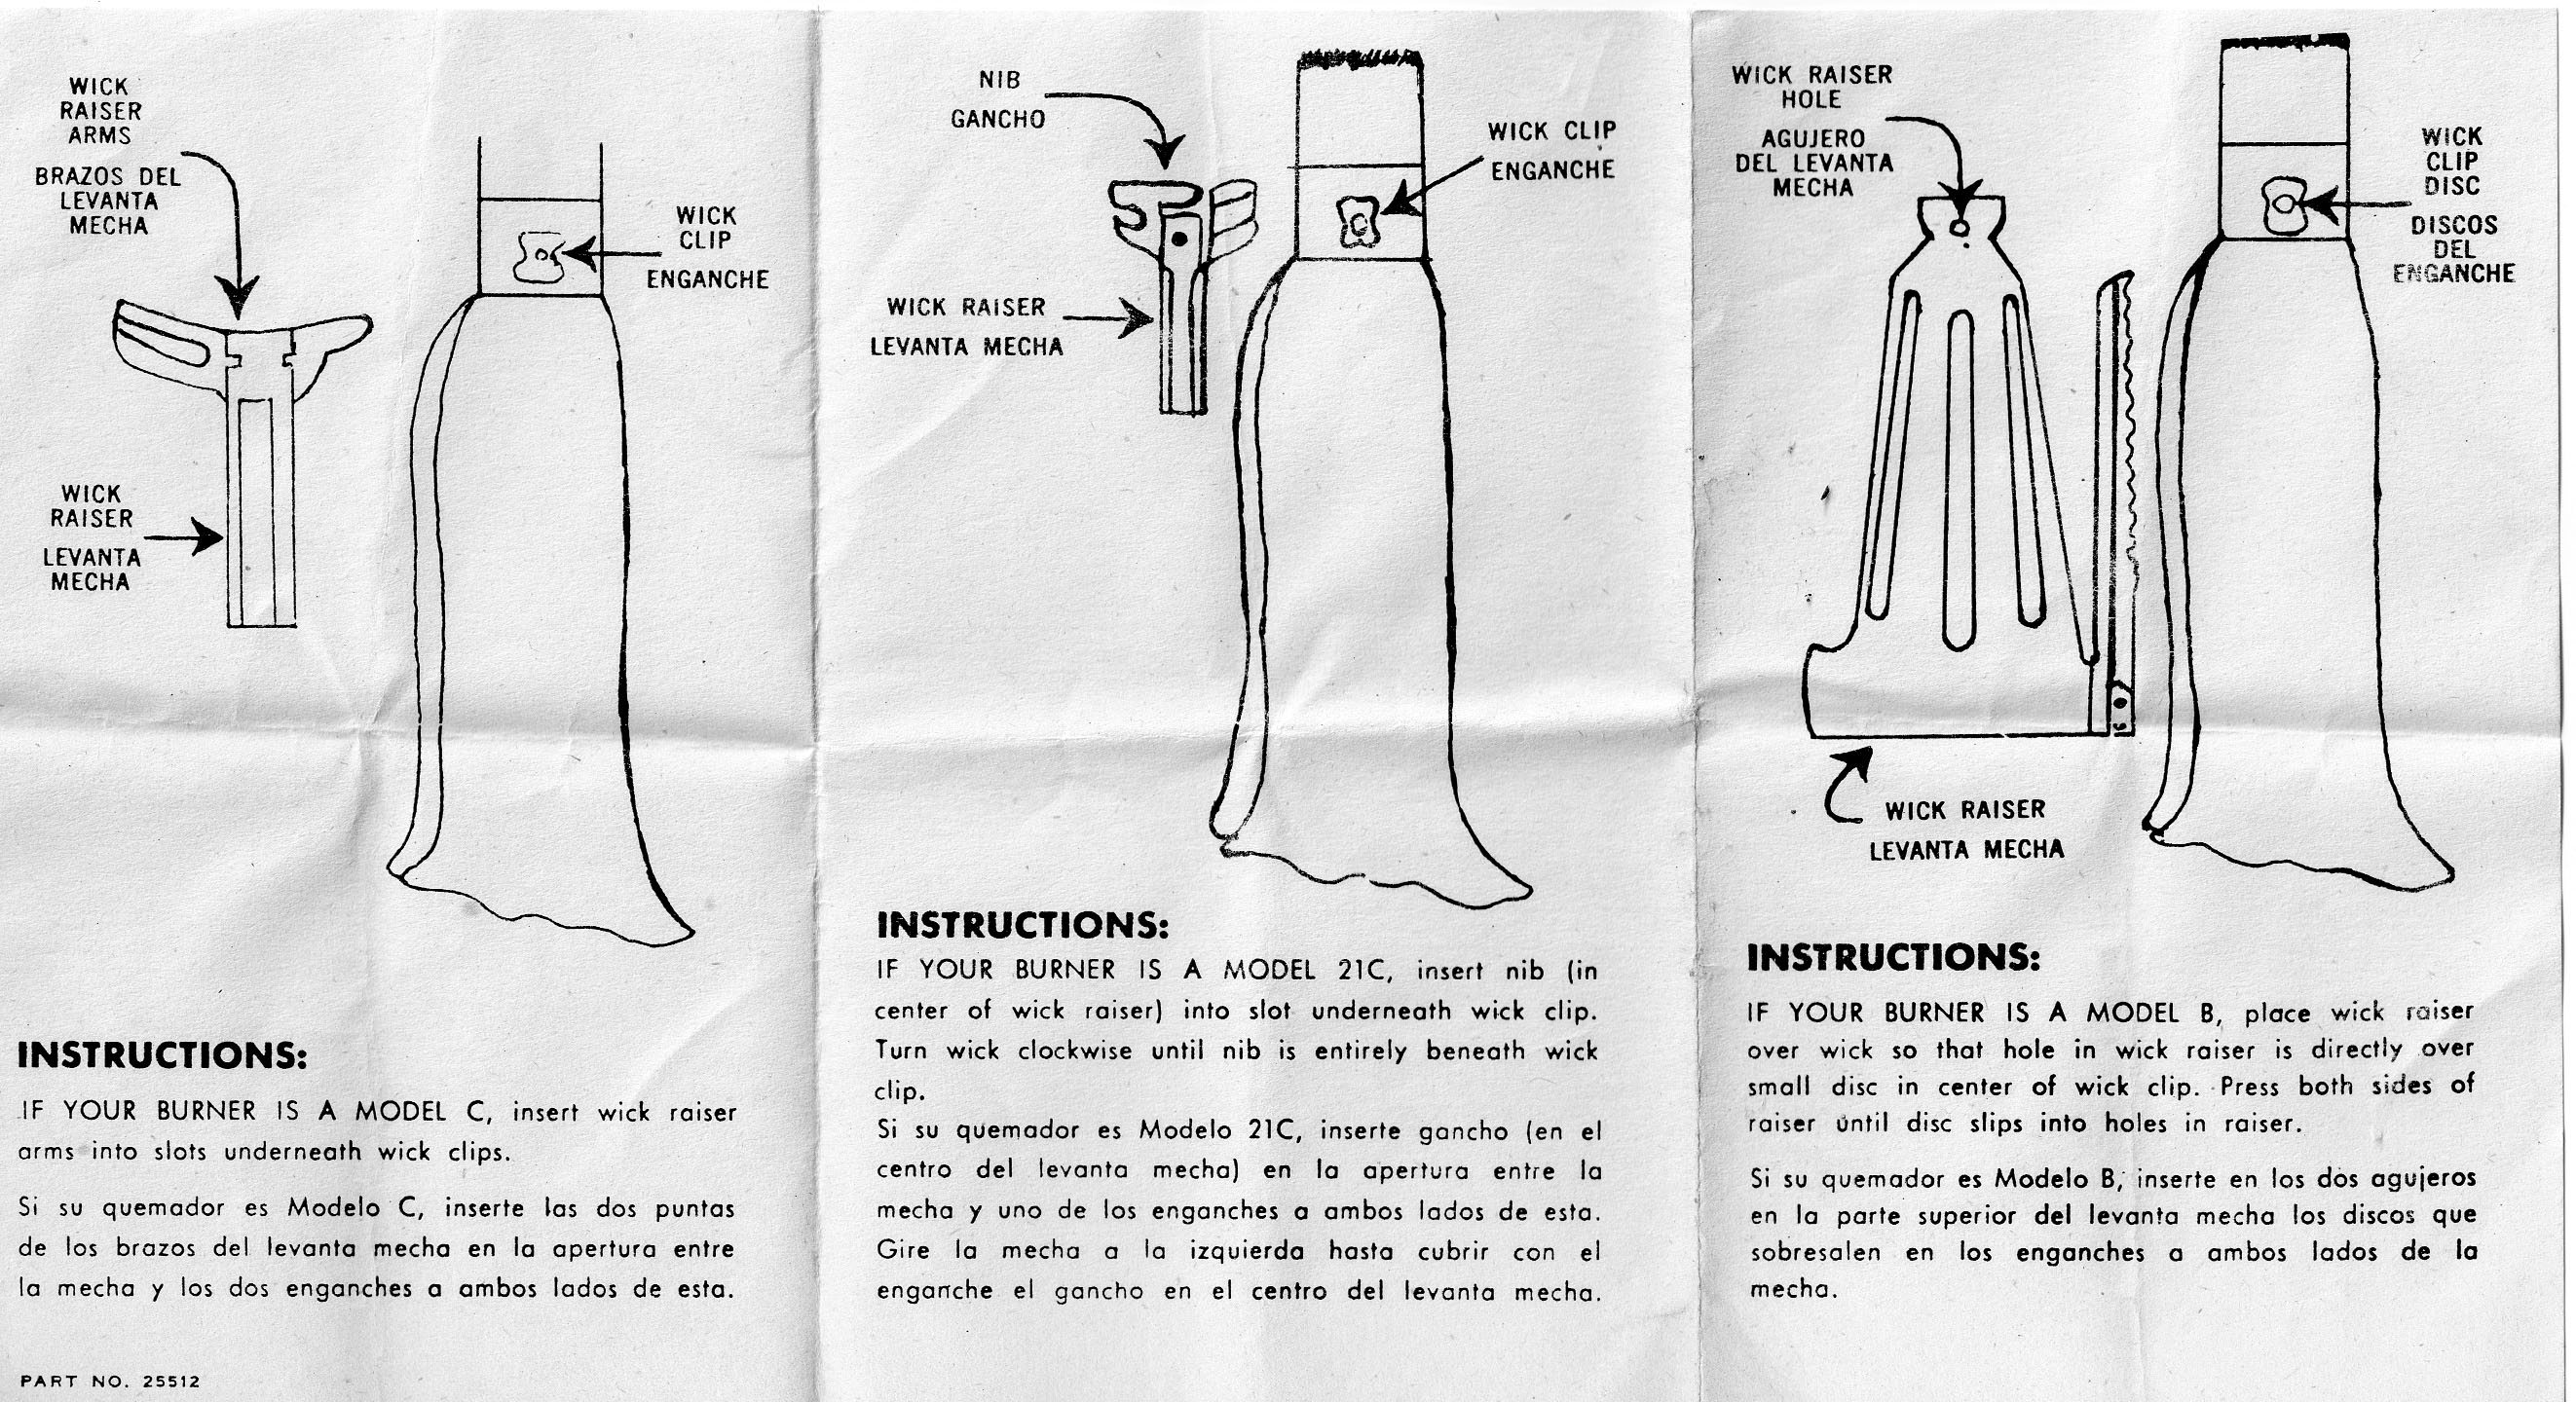
Wick:
An Aladdin wick is designed to be burned every evening for
over a year before requiring replacement. If
it is allowed to sit in evaporating kerosene over time or if
the
wrong
grade
of
kerosene
is used the wick life will be reduced considerably. Use the
correct kerosene and replace the wick when it starts to burn
unevenly
after maintenance.
Always strive to keep the burning tip of the wick looking like
new. It should be a smooth tapered tip with no loose threads,
jagged edges or carbon particles. The
wick should be cleaned with a wick cleaner every time the lamp
is
filled. I
prefer the current plastic wick cleaners to the older versions. It
is easy to use and does a better job than many of the earlier
cleaners. The
purpose of the cleaning is to knock off any deposits made by
burning the lamp before they build up and 'cement' themselves
to the tip of the wick.
Kerosene should be added to a lamp that has a dry wick
at least 2 hours before lighting the wick. Do not let
a lamp burn dry. This is very hard on the wick and will
shorten its service life. |
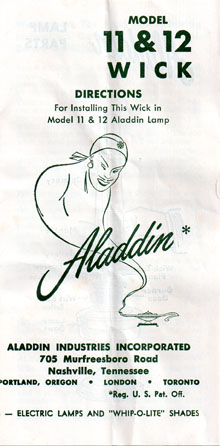
Click to download instruction in pdf form. Also works for late model 9, & model 10 lamps
|
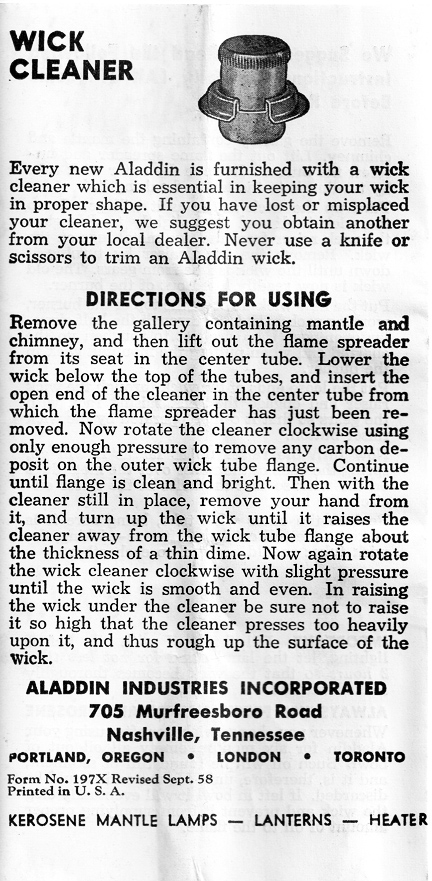
Cleaning the wick:
| Remove the flame spreader (generator) and raise the wick to
about 1/4 inch above the outer wick tube. Place the cleaner over
the wick with the barrel inside the wick.
Gently
turn the
cleaner a couple times in the clockwise direction only. Use
very little downward pressure. You
do not want to cut into the wick nor do anything that will
rough up the top burning surface. A rough wick tip creates
flame spikes that cause yellow sooty flames on the mantle surface. After
cleaning the wick, lower it to about 1/8th of an inch above the
outer wick tube then replace the flame spreader making sure that
it is properly seated. |
 |
Mantle:
A new mantle is coated with a flammable substance that provides
strength to the mantle while it is being transported. Both
Lox-On and Kone Kap mantles secure to the gallery by two
locking tabs. When
installing a mantle carefully follow the directions on the box
and make sure
that both tabs are engaged. The mantle will not burn correctly
if only one of the tabs is attached and it takes several hours
for the metal to cool down enough to properly reattach the mantle.
Here is a tip provided by Jim Race:
"Just because a mantle is brand new out of the box, doesn't mean
it's ready to work. With the mantle installed on the lamp, but
before it is flashed off, you should check for center alignment,
by looking straight down through the hole in the top of the mantle,
to see if it centers on the center hole of the flame spreader.
If adjustment is needed, you can carefully bend the two legs
of the support. This is an "eyeball" measurement, which
can be made more accurate, with the chimney in place (when sighting
down through). This simple adjustment will give you a more uniform
incandescence of the mantle and maybe extend it's life. " This
can also explain why some mantles burn brighter on one side than
on the other and break into a yellow sooty flame on the bright
side when you attempt to get the dim side to burn bright.
Once the mantle
is installed in the gallery, the coating should be burned
off
with
a match or propane lighter. Take
care not to actually touch the mantle with the match. Never touch
a mantle anyplace except the frame. Even if the protective coating
has not been burned off. Doing so
will leave an oil spot that will cause additional heat and
early mantle
failure.
Once the protective covering is burned off, the mantle becomes
very fragile and can be destroyed by tilting or jarring the lamp. Handle
a lamp with a mantle gently and don't tilt it. The gallery,
mantle and chimney get handled as a single unit to protect
the fragile
mantle.
New mantles should be stored in a dry location. Storage in a damp
humid area will make the mantle more fragile and usually leads
to shortened mantle life.
The Chimney:
When installing a new chimney on a gallery make sure it stands
square and that Lox-On bottom threads are not distorted. Lox-On
galleries manufactured in China during most of the 1990's are
poor quality. Many sit at an angle or have poorly made
threads. The newer chimneys are of much higher quality
as are the older ones. The poor quality Chinese chimneys
I have personally come across came in brown boxes with black
print.

All the chimneys I have come across that had poorly formed bases
have all come in this style box. I'm not saying they are all
bad I'm just suggesting that you look closely and test fit
it on a gallery before purchase.
Brass and glass expand at a
different rate and a tight chimney can crack under use. Sometimes
the Lox-On gallery mounting tabs need to be bent slightly to
achieve a fit with a chimney. A little loose is good,
a tight fit is asking for a crack. This is not an issue with
heelless chimney galleries as the fingers move with the glass
expansion.
Sometimes the fingers on heelless chimney galleries
(models 1-11, some #23 & 23A) get spread out too far to get a
good clamp on the chimney. A way to safely bring them closer
together is to wrap your thumb and longest finger around as many
gallery fingers as you can and gently squeeze to bring the gallery
fingers towards the centre. Repeat until you have gone
all the way around the gallery & test fit the chimney. You
want a firm fit. Repeat the squeeze as needed. Using
tools to bend individual gallery finger inwards can cause a finger
to break off or crack. Gently does it.
Lighting the lamp:
Remove
the shade if fitted. Remove the gallery, chimney and mantle as one assembly.
Adjust the wick until it sticks out of the outer wick tube by
about
1/8th inch. Light the wick without physically touching
the match to the wick. Wait until the flame has spread
completely around the wick and is burning evenly. Gently
replace the gallery, making sure that it is down and locked into
place. If
it is not, the air flow will be wrong and you will not
achieve a
proper
even blue flame. The gallery gets too hot to touch
fairly quickly. Remember
easy does it to keep from jarring the mantle.
Once the gallery is fitted over the burning wick, adjust the
wick until about half the mantle is glowing and sit back for
a while. The
lamp needs to reach its operating temperature before turning
it up.
As the burner heats up the airflow increases. As the kerosene
heats up it gets wicked up faster. All this means that
the mantle will get brighter by itself as the lamp and kerosene
heats up. Turn the wick up high before the lamp temperature
equalizes and the flame will continue to get higher on its own
until a yellow sooty flame bursts out on the outer edge of
the mantle. You should let side draft lamps sit for at
least 15 minutes, then adjust it until the mantle is about 3/4
glowing. For
a centre draft lamp weight about half an hour. With the
flame turned up the lamp will get hotter and the kerosene warmer. Over
time the mantle will creep up to full bright. Most people
get into trouble by turning the mantle up to full bright too
early then not watching it closely.
Extinguishing the lamp
Turn the wick down low then blow across the top of the chimney. Do
not blow down into the lamp.
Other things you need to know
- The Aladdin lamp requires a lot of
air to burn properly. This
means it can use up oxygen in a closed up room. Any lamp or
burning appliance that draws air from inside a room should never
be used in a closed room. Make sure that there is a source
of fresh air into the room. If
you are burning a lamp in a closed room and see the light starting
to dim, open a door or crack open a window to get some fresh air
coming into the room.
- A centre draft lamp should be sitting on a relatively smooth
surface. It draws air up through the holes around the base and
a shaggy
surface can partially obstruct the air flow and prevent the
lamp from burning properly.
- Mantle lamps are susceptible to breezes. They interrupt
the metered air flow to the mantle and cause uneven burning. Mantle
lamps should be burned in a breeze free location.
- Mantle lamps create a lot of heat which streams up through
the top of the chimney. You should have at least 3 feet
from the chimney top and the ceiling. Hanging lamps should
always be used with a smoke bell to break up the flow of heat.
- The warmer the air being drawn into the lamp the higher the
wick flame burns. The heat given off by a burning mantle lamp
can increase
the temperature of a room. It is equivalent to having
2000+ BTU heater running in the room. If the flame
burns too high a yellow sooty flame will
start on the surface of the mantle.
- When filling a lamp, both the lamp and kerosene should be at
or close to the surrounding air temperature. This is to prevent
water vapor condensing inside the lamp bowl during the fill
and adding water to the kerosene. Also cold kerosene added
to a room temperature
Model A or B glass lamp can cause it to crack.
- Besides blocking drafts the chimney also pulls hot
exhaust air out the
top, which
in
turn
draws fresh
air into
the
burner. The
length of the standard chimney is correct for between sea
level and about 3000 feet elevation. Lamps burning at
an elevation higher than 3000 feet should use either the longer
high altitude
chimney or the brass chimney extender that fits to the top
of the standard chimney.
- This should go without saying, never ever use gas or other
fuels in a kerosene lamp and never try to add fuel to a lamp
while
it is burning.
How to recover from having a yellow sooty flame deposit carbon
all over a mantle
Runaway lamps happen to all of us once and a while.
When the wick flame gets too close to the mantle a yellow sooty flame erupts
on the mantle's outer surface. This flame deposits
soot on the mantle surface, blackens the inside of the chimney
and
spreads soot within the room.
All you need to do is turn down the wick until the mantle glow
is reduced to between one third and one half. The flame will
slowly burn the soot deposit off the mantle without damage. Never
burn the lamp with the flame too low cause the mantle to glow. The
flow of air is reduced and the metal burner can overheat.
After the lamp is extinguished and is cool, remove the chimney,
being careful not to touch the mantle then wipe out the inside
of the chimney. Remove the gallery and clean the wick with the
wick cleaner. Visually
examine the flame spreader to make sure it is clean and there is
no build up around the holes. Reassemble and the lamp should
be as good as before the flame up.
Also, from Aladdin: Helpful
hints for using your Aladdin lamp (1944, .pdf file)
|